Showing posts with label crochet. Show all posts

Wednesday, 17 April 2013

My Beautiful Baby Blanket...

 Baby Blanket - Hand Crochet by Em
Floral Cushion - Vintage
Flat Cushion - India Jane
Chair - Secondhand

So... whilst I have been absent from blogging, what have I been up to...
One of my projects... and a big project at that... was making this beautiful crochet baby blanket for my new little son...

I used the basic pattern from the
'Cute & Easy Crochet' book by Nicki Trench...
and adjusted it to suit...
It took me a while but I finally got there!..


Wednesday, 30 May 2012

Mollie Makes... Tutorial Tuesday...

I am absolutely thrilled to be featured in this weeks Mollie Makes Tutorial Tuesday...

... sharing my very own 'How to make a mini crochet pin cushion'...

I have updated the colours since I last shared this 'How To' with you all...

in fresh spring pink, soft blue and washed lime...

Its a great little project for beginners... so why not pop over to the Mollie Makes blog and check it out...

You could also take a look at my crafty little 'How To's' here using the button on the right of my page...

Hope you enjoy!.. Thanks Mollie Makes :)

Friday, 18 May 2012

How To... Make The Mollie Makes Crochet Flower...

 Crochet Flower Project - Anna Rakoniewska for Mollie Make Magazine

You Will Need...
4mm Crochet Hook
Your choice of woolen yarn

Crochet Stitches...
ch... Pass hook under yarn and catch yarn with hook, draw yarn through loop on hook (repeat to chain) 

dc... Insert hook into stitch, yarn over, draw back through stitch (2 loops on hook), yarn over, draw yarn through both loops on hook
(1 loop remains on hook)

tr... Yarn over, insert hook into stitch, yarn over, draw back through stitch (three loops on hook), yarn over, draw yarn through 2 loops on hook, yarn over, draw yarn through last two loops on hook
(1 loop remains on hook)
ss... Insert hook into stitch, yarn over, draw loop back through stitch and loop on hook
 
 After my post showing off the lovely Mollie Makes crochet flower I made, I received a few comments and emails from followers having difficulties with the making of their own Mollie Makes flower...

Although this is not my design, I decided to put together this post to show you how I went about completing the project...
 
To begin... ch1... 
then 6dc into first ch...
Pull yarn tail to close hole in ring...

Now... add a stitch marker using a scrap of different coloured wool...

Working into the loops around the outside only...
...work 2dc into the first stitch
...1dc into the next stitch
Repeat this twice more
(you will have 9st around the outside of your circle, as in picture)

Move your stitch marker to this point
 Working into the loops around the outside only...
...work 2dc into the first stitch
...1dc into second stitch
...1dc into third stitch
Repeat this twice more
(you will have 12st around the outside of your circle, as in picture)

Move your stitch marker to this point

Working into the loops around the outside only...
...work 2dc into the first stitch
...1dc into second stitch
...1dc into third stitch
...1dc into forth stitch
Repeat this twice more
(you will have 15st around the outside of your circle, as in picture)

Move your stitch marker to this point


To start the spiral on the front of the flower...
You will be working into both loops around the outside of the circle and the unused loops spiralling the centre of the of the circle...
 ch2...

...and work 1tr into the same stitch
...1tr into the next stitch

...work 2tr into the next stitch
...1tr into the next stitch
Repeat this until you reach the last stitch on the outside of your circle
...just before your stitch marker
(this is what your work will look like)


You will then work into the first unused loop nearest to you...
(in the centre of your work)
...work 2tr into the first stitch
...1tr into the next stitch
Repeat this until you reach the last stitch at the spiral base, in the centre of your work...

(your work should now look like this)


Now you will be working outwards from the centre of the spiral, creating the petals of the flower...
First... ch2...

...miss the first stitch
...1dc into the second stitch
...miss the third
...2tr into the forth
...miss the fifth
...1dc into the sixth

then... miss the seventh stitch
...3tr into the eighth stitch
...miss the ninth
...1dc into the tenth
Repeat this again

now... miss the next stitch
...4tr into the next stitch
...miss the next
...1dc into the next
Repeat this twice more

...miss the next stitch
...5tr into the next stitch
...miss the next
...1dc into the next
Repeat this three more times

You will now have the back of your work facing you...

...miss the next stitch
...6tr into the next stitch
...miss the next
...1dc into the next
Repeat this four more times

Once you reach the end of your flower remove your stitch marker... 
...cut your yarn and fasten off...

I then finished my flower by darning in the loose yarn... and attaching the brooch pin...

I hope this little tutorial has helped you out!.. Please leave a comment and let me know how you get on :)

Wednesday, 4 April 2012

Cute Crochet Bunting...

 Crochet Bunting
- The Oak Room, Hertfordshire

How cute is this mini crochet bunting from The Oak Room...

...A great addition to any bare wall... this pretty hand crocheted bunting will brighten up the room!..

It would make a lovely little Easter gift too!

Remember to check out my little 'Vintage Map Bunting Giveaway'...

Wednesday, 21 March 2012

Mollie Makes... Crochet Flower...

This weekend I finally got round to making my cute crochet flower brooch...

... the fantastic little project by Anna Rakoniewska, featured in this months Mollie Makes magazine...

After a lovely girly weekend with my mam for Mothers Day, we decided to spend some time on the cute crochet activity...

After a couple of attempts we managed to get our flowers looking how we wanted :)

...and I'm really happy with the final result...

My mam pinned hers to one of her favourite tops... and I think I might attach mine to a cushion as a decorative detail...

Has anyone else made their MM crochet flower?

I would love to hear how you got on... so please leave a comment below...

Monday, 5 March 2012

Little Kenny...


I recently spent some time making a friend of mine a decorative crochet blanket for her little ones christening...

anyway... to cut a long story short... it went wrong and I ended up buying a gift instead...

Although I was a bit upset,
all was not lost...
it seems little Kenny had his eye on the blanket and it soon became his...

...it's a bit girly but he doesn't seem to mind!..

The blanket is now sporting a floral fabric patch, as Kenny decided to have a little nibble of the edge :)

Monday, 13 February 2012

Winner... Mini Crochet Pin Cushion...

Mini Crochet Pin Cushion
 - handmade by daffodils & snowdrops

Last Monday as a thank you to all my lovely followers and as a little blogaversary treat I decided to hold a giveaway... 

Thank you to all of you who took the time to enter...

To choose a winner, I decided to use the traditional method of 'drawing a name out of a hat'...

 I wrote down everyones names who entered on little slips of paper... and put them into one of my little floral bowls to pull a name...

...and the winner is... 

Sara, from Sew Appetising blog... 

Please email me at daffodilsandsnowdrops@gmail.com with your address and I will send you your mini crochet pin cushion...

Hope you enjoy it!..

Em x

Friday, 10 February 2012

How To... Make a Crochet Valentines Heart...

Crochet hanging hearts 
- handmade by daffodils & snowdrops

You Will Need...
4mm Crochet Hook
Your choice of woolen yarn

Crochet Stitches...
ch... Pass hook under yarn and catch yarn with hook, draw yarn through loop on hook (repeat to chain) 

dc... Insert hook into stitch, yarn over, draw back through stitch (2 loops on hook), yarn over, draw yarn through both loops on hook (1 loop remains on hook)

tr... Yarn over, insert hook into stitch, yarn over, draw back through stitch (three loops on hook), yarn over, draw yarn through 2 loops on hook, yarn over, draw yarn through last two loops on hook (1 loop remains on hook)

htr... Yarn over, insert hook into stitch, yarn over, draw back through stitch (3 loops on hook), yarn over, draw yarn through all 3 loops on hook (1 loop remains on hook) 

ss... Insert hook into stitch, yarn over, draw loop back through stitch and loop on hook

 With Valentines day just around the corner, I thought I would share some love and show you how to make your very own little hanging heart decoration...

Using different styles of yarn can change the finished look of your heart... so once you have mastered the technique, why not have a play around...

To begin... ch4 and join with a ss to form a ring... (as in picture)

ch2 and work 8dc into the ring
 ss into second chain of your initial ch2 to join...
(9stitches around the outside of your circle)

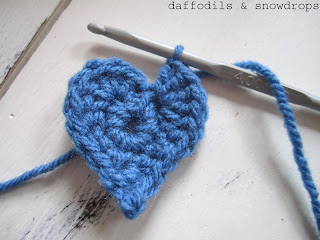
  Then... Work 5tr into 1st stitch, 1 tr into 2nd stitch, 1htr into 3rd stitch, 1dc into 4th stitch...
(this is what your work should now look like)

Next... 1tr into 5th stitch, ch2, ss into 2nd chain from hook, 1tr into 5th stitch...

Work 1dc into 6th stitch, 1htr into 7th stitch, 1 tr into 8th stitch, 5tr into 9th stitch...

Then cut your yarn leaving enough to make a loop for hanging...

Insert your hook into the inward point at the top of your heart (see picture)

Yarn over, draw loop back through to front of heart and through loop on your hook...

 Pull the end of your yarn to tighten and form the inward point at the top of your heart...

Then pull the yarn back through to the back of your work...

Taking a darning needle work any loose bits of yarn from the start of your heart into the back of your work...

Then snip off any loose ends...

Lastly... Form your hanging loop by darning the end of your yarn into the back of your work...

...and there you have your little hanging heart...

 Use it as a decoration or even attach it to a card for your valentine...

Happy Valentines Day x

Don't forget to check out my mini crochet pincushion giveaway...
Related Posts Plugin for WordPress, Blogger...